Showing posts with label Writing. Show all posts

Wednesday, January 15, 2014

Writing Station Make-Over

I love, love, love to craft. I think it started at a young age because I would rather get crafts then toys. I was super excited to team up with Jo-Ann Fabric and Craft Stores to create my next project! Did you know that teachers can get a discount every time they shop with Jo-Ann? Us teachers ALWAYS like discounts. 


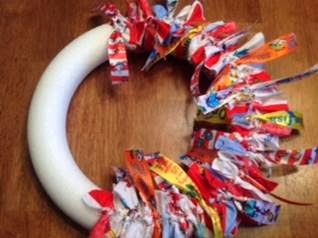
I decided to make over my writing area! The first item I created was a new wreath to hang over the area.
Here are the materials you will need:
-1 yard of fabric of your choice
-3-4 spools of ribbon
-foam wreath


Direction:
Step 1: Cut the fabric into 14 1/2 inch strips.
Step 2: Cut the ribbon into 11 inch strips.
Step 3: Tie a pattern of fabric and ribbon around the wreath.
Step 4: Tie a ribbon around the top to hand your wreath. 


The second item I created was a ribbon pompom.
Here are the materials you will need:
-foam ball
-square foam
-straight pins
-4-5 spools of ribbon
-1 dowel
-spray paint
-1-2 spools of mesh
-metal container
-hot glue gun


Directions:
Step 1: Spray paint the dowel and let dry. Depending on how tall or short you want your pompom will depend on how much you need to saw off.
Step 2: Cut ribbon into 4 inch strips.
Step 3: Make a loop and put a pin in one side of the ribbon. Attach the second ribbon slightly on top of the first and put the second pin in. Repeat this step in a straight line around the foam ball. Continue this process until the whole foam ball is filled.
Step 4: Use a sharp knife to cut the edges of the square foam off for it to fit into the mental container.
Step 5: Push the dowel into the bottom of the foam ball and also into the middle of the foam square.  
Step 6: Cut the mesh into squares about 3 inches around. Use a hot glue gun to cover the square foam in the metal container


Lastly, I wanted to create a new organizer for my student’s writing materials.
Here are the materials you will need:
-spray paint
-wooden box
-letters
-mental containers
-wood paint
-q-tips
-hot glue gun


Directions:
Step 1: Spray paint the wooden box and let dry.
Step 2: Use a q-tip to paint polka dots on the white letters and let dry.
Step 3: Hot glue the letters on the wooden box.
Step 4: Place the metal containers in the box and organize supplies. 


I absolutely love the way my writing area turned out, thanks to Jo-Ann Fabric and Craft Stores!  


If you would like to see more amazing projects check out these other bloggers: 

January 15th: Buggy for Second Grade
January 16th: Second Grade Sparkle
January 17th: Kleinspiration

I also have a special treat for my bloggy friends! Use the coupon below to receive 25% off so you can get your craft on during the long week!


The following review is part of a Jo-Ann Fabric and Craft Stores® campaign. I received compensation for this review; however, this is my personal, honest opinion based on my experience.


Sunday, May 12, 2013

Poetry

I always love this time of year because I get to teach POETRY! By this time the kids are ready to move from writing nonfiction pieces, small moments, and opinions pieces to something a little more fun! First we start off by talking about how poetry is different from a story:

1. shorter
2. where are the periods?
3. sounds like music
4. line breaks

We take this list and we talk about each item...the one I really focus on first is that it has line breaks. I write a poem on a piece of poster paper that doesn't have line breaks and the kids realize how boring it is, then I write it with the line breaks and the realize how different poetry really is from books. 

The next lesson we talk about how poets looks at something ordinary in a different way or light. This is the lesson that I really get to see how creative the are! Here is a poem we wrote during that lesson together:


I would believe they thought of their desk as a jungle...! Once they master the concept of writing poetry about something ordinary but looking at it differently then we talk about how we can look at our feelings differently in a poem. This lesson I taught them that we can hold our feelings in something. I gave the example of holding happiness in music! Here is the poem we wrote:


Next we talked about that two different strategies to write poetry: breathless and writing to something. Writing to something means just that...you are writing to your topic! Breathless poetry is their favorite. This is perfect for my friends who were still trying to write a story but just using poetry paper. You explain to the students that you were outside running around and then you come in to tell your papers what happened but you are out of breath...this helps them understand the line breaks and that a poet doesn't give all the details of story, just a few! 


In this poem we were writing to the last day of school!


This was a breathless poem explaining our clip chart! 

After each mini lesson that I described above the students would go back to their desk and write poetry for about 15-20 minutes. During that time I conference with individual kids to help them improve!

How do you teach poetry?

This week is only a 4 day week for us because we have Field Day on Friday! I am super excited for that as long as it doesn't rain! Enjoy your Sunday! 

Tuesday, January 29, 2013

Writers Revise!!

I wanted to share with you about our peer revising that we do in my class! Before I get started we are using the Lucy Calkin's Writing Units....I totally want her new ones but am waiting to see where I will be next year before I make the purchase! We are just finishing up the Craft of Revision Unit, but my students learned how to peer edit during the Writing for Readers Unit. I really liked the Writing for Readers Unit because my students really understood why we write....for someone to READ it! Their handwriting, spelling, punctuation  and everything else improved so much during that unit. Now we are revising actual parts of the story, like adding a great lead, showing emotions not telling emotions, and even adding DIALOGUE  I can't believe my little babies have dialogue in their stories...I can't believe my eyes when I see a student's writing during our conference time and there is dialogue in it and it makes sense!

Here is how we revise:

First I always model how I want my students to revise with a peer.....I sit next to a student and we hold the piece of writing in between us. This is much like Read to Someone in D5! I also show them that each person points to the words as they are reading. This is important because if their peer can help them spell a work they can stop along the way.


Second I always make sure to model how we talk to each other during revising time. We always start off with saying the persons name and then would you please read your piece to me. 

Example: Kelley, will you please read your piece to me?

We also talk about how to tell someone to fix something nicely. 

Example: Kelley, I can't read your writing. Can you please make your handwriting neater? 
Kelley, why don't you have a picture? Can I help you think of something to draw?
Kelley, can I help you spell this word?

Third, I model how to use our green check list cards. These help the students make sure they are writing for a reader! 


Lastly, I model how to finish up revising time with a partner. We also say thank you for helping me today and also give one suggestion for the other person to go back to their desk and work on. 

Example: Thanks for helping me today. Can you go back and fix your handwriting? 

Then I let the kids go REVISE! 

Teaching writing is probably one of my favorite things to teach! 

If you haven't checked out Lucy Calkins or her new units click here!

It was a crazy day today...my teammate had a rough day! Little does she know she will have a care package on her desk in the morning! ;)


Saturday, January 5, 2013

We're Back....and Tired!

Oh man!! We went back to school on Thursday and I don't think I was quite ready. I was so tired once Friday night came around...I couldn't even stay up to 8:00! It doesn't help that the hubby is sick and gets up all night coughing and blowing his nose. According to him, he is "dying!" We all know that guys are wimps when it comes to being sick! :)

I thought I would share what we did the past two days! First of all we started a new Lucy Calkin's Unit called the Craft of Revision. At first I didn't think I was going to like teaching this unit, but I love it!!


We talked about the first things a writer does when they revise or decide to revise their work. My students are only allowed to revise their work during writers workshop time, not during Daily 5. We are going to use Daily 5 writing time to just write and then during writers workshop they can put pieces in their revision folders and use all the new tools I placed in our writing area! 


While I was teaching during writers workshop this week I created a writers tool belt, where I kept a pair of scissors, tape, and purple pen! (the kids looved the purple pens!)


We also reviewed all of our Daily 5 I-Charts! I was so glad I did this because the kids got right back into the swing of Daily 5 on Friday. They knew the expectations and did a great job!


For phonics we reviewed short and long vowels. The students sorted pictures of short and long vowels!


I have this on the TpT store for 1.50 if you are interested! 

In math we reviewed addition with regrouping and mixed problems. Next week we will be in full swing of subtraction with regrouping! I loove Amy's unit for subtraction! She does a great job of teaching subtraction with regrouping and makes it fun for the kids!

I hope to start working on a Fairy Tale unit tomorrow for February! 

Have a great weekend!! 


Tuesday, December 4, 2012

We have been up to...

Wow! I can't believe it is already December! We have been very busy in my class. Last week we finished up our unit about life cycles, studying the life cycle of a flower or plant. We made a really cute project...too bad it isn't spring time already. I did hang them out in the hall, to brighten up the place!


We read the following books all week and talked about the main idea. We wrote the main idea of each book on a sentence strip and then compared/contrasted them all. (Common Core all the WAY!)


In writing we are working on our small moment unit, which is my favorite. We have been reading some mentor text to help us understand what I small moment is. 


In math we took our unit assessment and reviewed odd/even numbers. I had to of course make an Even Steven and Odd Tod like Cara did! Hers were just sooo cute! 


Today we started our new unit about shapes. We started off learning about points and line segments. We used dry pasta to help us make line segments and connect them to make shapes. This was a great hit with the students! 


Lastly I leave you with a picture of lil helper...he can't wait for Santa to come! 


Glitter Words
[Glitterfy.com - *Glitter Words*]

Monday, October 8, 2012

American Symbols, Math Games, and Opinion Writing!

Last week we started our unit on "We the People." First up was to talk about a few of the important American symbols...I would have loved to talk about more, but we had a short week so we only got to three!


We talked about summarizing, therefore we used this little anchor chart to help us write our summaries. When we talked about the Liberty Bell we read " Officer Buckle and Gloria," because I wanted them to realize that we have some freedoms but it is important to follow laws and rules too!


The other book we read was Red, White, Blue, and Uncle Who? It has a page about each of the different American symbols!


We made these foldables to go along with our summaries and symbols!

Last week we also had conferences....which I had the time to make these great math games that are Pinterest inspired!


The kids "toss" a dice or marker then add the two numbers together. These green ones are easy! I also made a harder set and then I figured I could also mix the two!


Today we worked on writing opinion pieces. We reread the story "Don't Let the Pigeon Drive the Bus!" The kids then had to decide if the pigeon should or shouldn't drive the bus!! Everyone of my kids said that he shouldn't be allowed! We used this paper to help us before we wrote our piece!


Here is the crafty we made with their writing!!!


This week we also have our 2nd grade get together again! Of course I am getting everything all ready to go! I will show you picture later this week or next week. Happy Monday! 


Glitter Words
[Glitterfy.com - *Glitter Words*]